IDM 241: Case Study

This case study discusses the process I went through when creating a simple microinteraction and eventually a complex one for my microinteraction class. I was introduced to microinteractions and their structure, and had to apply what I already knew how to do in code to create my own microinteraction and build on it throughout the course. I talk about the design choices I made and the steps I took to successfully code what I had planned to do for my microinteractions. For the final project, I was able to code my own complex microinteraction using HTML, CSS, jQuery, and Javascript.
This was a project that I was working on during the Fall 2021 term for my IDM 241 Microinteractions class. In this class, I learned about what microinteractions are and their structure: triggers, rules, feedback, and loops and modes. We learned how to identify each component and then coded our own microinteractions using HTML, CSS, and Javascript. I started with a basic microinteraction and added to it throughout the class to end it with a complex microinteraction for my final project.
This solo project was assigned to challenge me to build on the HTML, CSS, and Javscript skills I had previously learned and successfully create a microinteraction. I had to apply what I already knew to create something that I had just learned in the beginning of the class. Microinteractions are an essential piece to a user's understanding of what they are doing on an interface, so my microinteraction had to demonstrate that as well.
This was the first part of my project: creating a simple microinteraction. The hardest part about this assignment was coming up with what I would actually be using as my microinteraction. Most of my process consisted of searching for inspiration and choosing something really simple so I could make sure I understood how to code it and explain the structure of it. This microinteraction was triggered on a mouse hover.
After planning on what I would be doing for my simple microinteraction, it was now time to code it. I found a working example online and played with that code to see if it would work with my example. I worked in Visual Studio code and mainly used CSS transitions to make my microinteraction work. View my Alpha Build here.
After building the alpha, I had to find a way to add on to the microinteraction to make it a little bit more complex. After a while of brainstorming, I decided that I wanted to include a modal and have my alpha build be the second part of the microinteraction. I chose to make a share button that expands on a click and have links appear because I could see myself using it on my personal website.
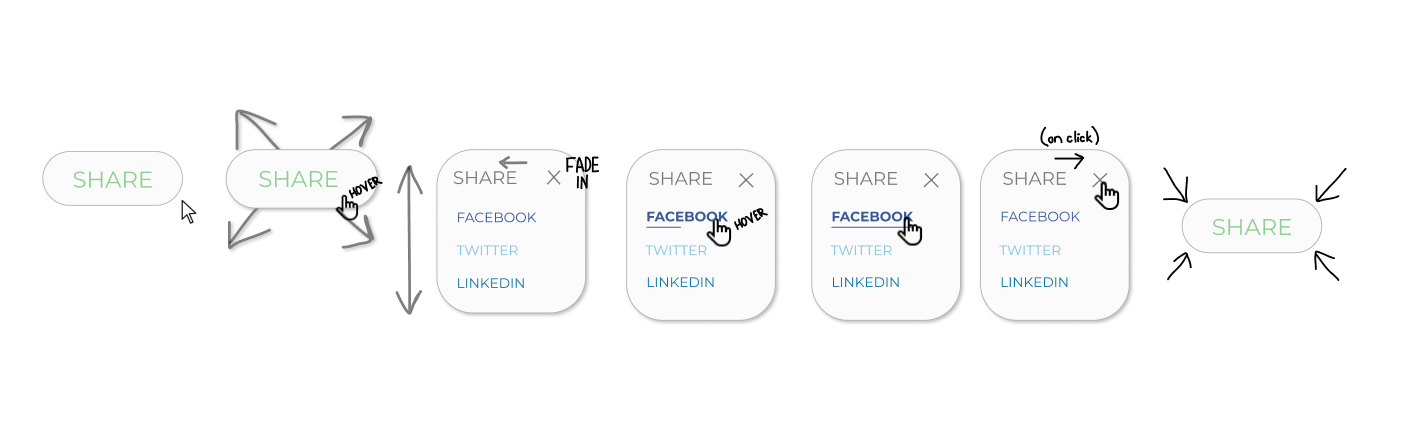
Once I had my description down, it was time to code. I found another working sample of what I wanted to replicate and started coding the HTML and CSS. I then added a Javascript file to be able to open and close the button. When I tested it, it wouldn't work. What I soon found out was that the working sample was using jQuery, and not Javascript. It took me a while to figure it out, but I learned that I had to add a Jquery library to the HTML file to get the Jquery to run. After that, the only difficulty I had was stylizing each link, and I figured that out by pinpointing each specific link and using the correct class names to stylize them with my professor. View my Beta Build here.
After the Beta project, it was time to make the microinteraction even more complex for my final. I felt good about the Beta, so for the final I just had to add a few more things to complete the microinteraction. I decided that I wanted to add sounds for when the button expands and closes. The hardest part about this was finding the sounds that I wanted to use and making sure that they made sense for this. I also wanted to make the links actually work, so when the user clicks the link a separate window opens with that page.
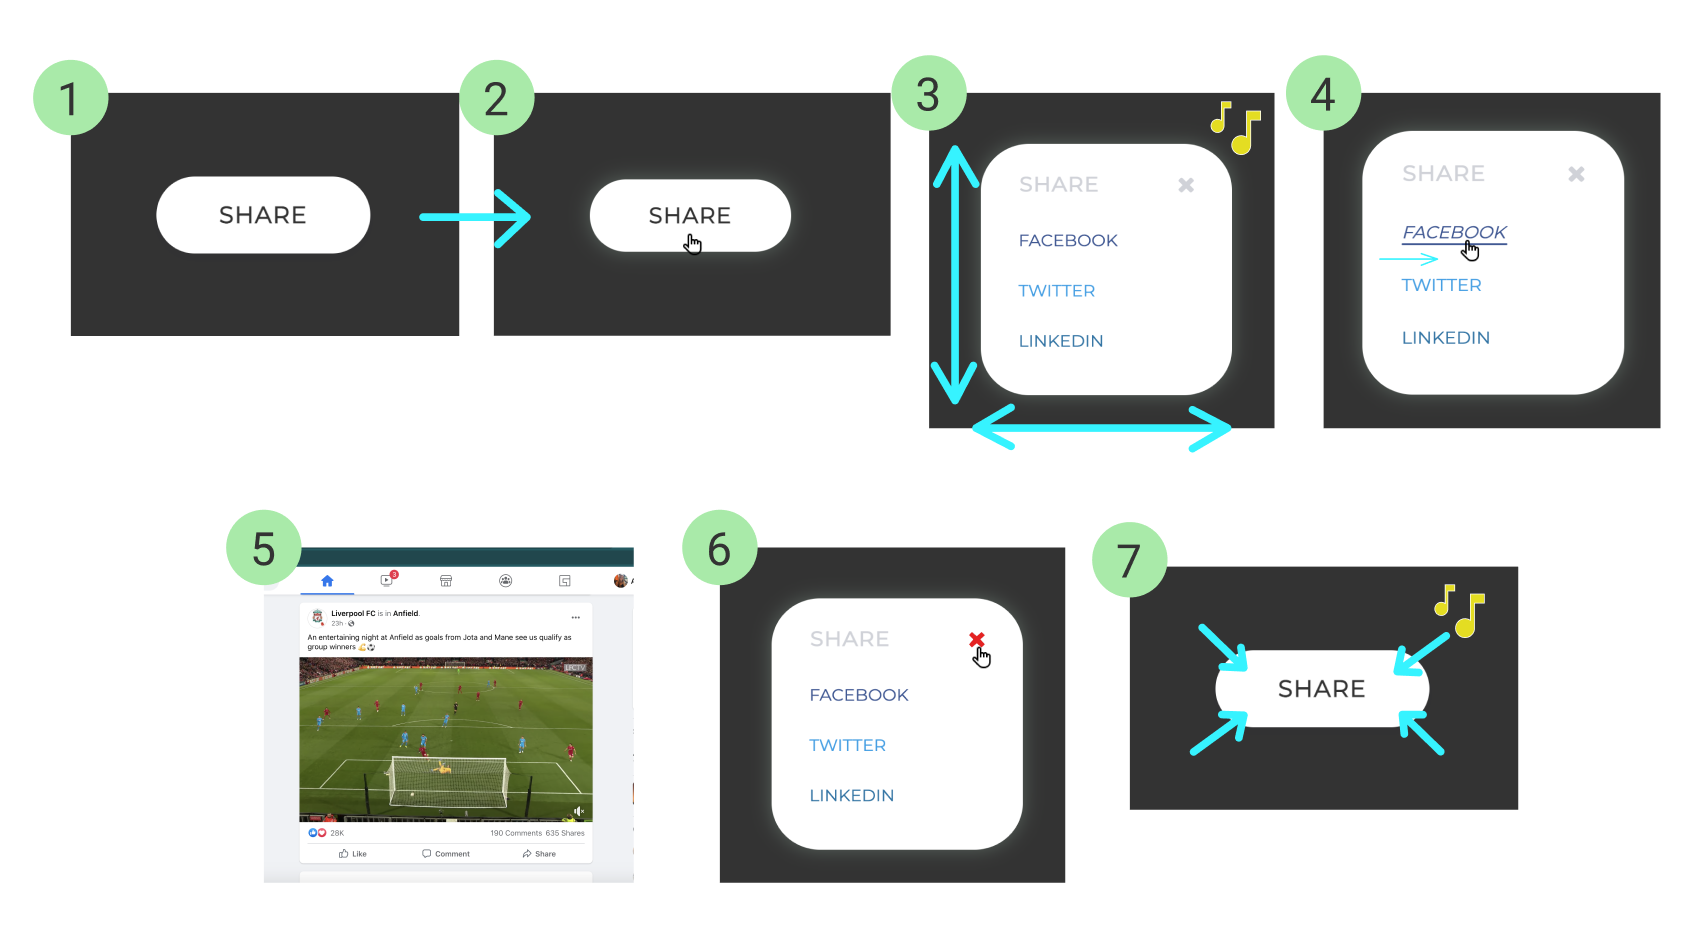
It was time to start coding out my final description. I decided to focus on the links first, since I knew how to do that better than the sounds. The only obstacle I faced for that part was taking the text-decoration away so that the links looked the same as they did in the beta build. This is because default links appear blue and have an underline, and I didn't want that so I fixed that. After that, I worked on incorporating the sounds using Javascript. Searching for examples helped me to correctly play the sounds on clicks, but the problem that I ran into was that after the initial click, every time I clicked the modal the sound would play. I only wanted the sound to play once on the button open, and once on the button close. With direction from my professor, I learned how to do an open flag if statement so that if the button was clicked the sound would play once. View my Final Build here.
Overall, I am happy with the final result and how I made my microinteraction more complex throughout the class. I successfully coded a complex microinteraction with no breaks and errors using HTML, CSS, Javascript, and jQuery. If there was something that I didn't know how to accomplish, I used my resources for guidance and learned a lot along the way. I was able to create a relationship between all three projects and it's easy to identify the gradual build up of the complexity of the microinteraction and difficulty it took to code it. I also now know how to spot a microinteraction and how to dissect it into triggers, rules, feedback, and loops and modes. If I had more time, I would most likely incorporate more sound effects or add more links/even stylize them some more. Overall, I enjoyed coming up with creative ways to add to my microinteraction after starting from scratch.